01 Jul 2026
pyPreservica provides functionality to upload packages directly to Preservica using the
upload_zip_package method in the Upload API.
This allows users to upload packages as quickly as they can be created. This is not necessarily a good thing —
submitting packages faster than the ingest pipeline can process them can cause queues to back up, and put unnecessary
load on the server, Preservica will queue packages on the server which cannot be processed immediately so
packages will never be rejected, but this can cause the ingest queue to grow.
To give users better control over their upload throughput, upload_zip_package now accepts a limit_per_minute
parameter that caps how many packages are submitted per minute.
How it works
Rate limiting is implemented using the pyrate-limiter library,
which provides a robust leaky-bucket algorithm for controlling request rates in Python applications.
The leaky bucket algorithm
The leaky bucket algorithm is a common approach to rate limiting. The “bucket” has a fixed capacity
set by limit_per_minute. Each upload consumes one slot in the bucket. pyrate-limiter tracks how
many requests have been made in the last 60 seconds using a rolling window — once the bucket is full,
any further upload calls block until enough time has passed for older requests to fall outside that window.
  Uploads arriving
  at any rate
       │  │  │
       ▼  ▼  ▼
  ┌───────────────┐
  │  ● ● ● ● ●    │  ← bucket fills up (limit_per_minute slots)
  │               │
  └───────┬───────┘
          │  blocks when full;
          │  unblocks as slots expire
          ▼  after 60 seconds
   Preservica ingest
Importantly, the limiter does not space uploads evenly across the minute. If limit_per_minute=60,
your script can still fire all 60 uploads in rapid succession — it will then block until the oldest
requests are more than 60 seconds old and slots become available again. The constraint is on
how many uploads happen per minute, not when within that minute they happen.
The rate limiting does not impact the upload speed to Preservica, this still happens as fast as your
network allows, the rate limiting is only impacting the number of uploads per minute.
The new function signature is:
upload_zip_package(path_to_zip_package, folder=None, callback=None, delete_after_upload=False, limit_per_minute=180)
The limit_per_minute parameter defaults to 180, which corresponds to three uploads per second —
a rate faster than most packages can realistically be created, this is effectively the unlimited rate.
Reducing this value slows down the upload rate.
Basic usage
A simple upload with the default rate limit requires no changes to existing code:
from pyPreservica import *

client = UploadAPI()
folder = "9fd239eb-19a3-4a46-9495-40fd9a5d8f93"

package = simple_asset_package("my-document.pdf", parent_folder=folder)

client.upload_zip_package(package)
Reducing the upload rate
If you are running a long bulk ingest with existing packages which already exist and want to avoid placing heavy load on the server,
lower limit_per_minute to a more conservative value:
from pyPreservica import *

client = UploadAPI()
folder = "9fd239eb-19a3-4a46-9495-40fd9a5d8f93"

for file in Path("packages").glob("*.zip"):
    client.upload_zip_package(str(file), folder=folder, limit_per_minute=15)
Here uploads are capped at 15 per minute, giving the ingest pipeline time to
process each package before the next one arrives.
Increasing the upload rate
On a lightly loaded system, or when running an urgent migration, you can raise the limit to
push packages through more quickly:
from pyPreservica import *

client = UploadAPI()
folder = "9fd239eb-19a3-4a46-9495-40fd9a5d8f93"

for file in Path("packages").glob("*.zip"):
    client.upload_zip_package(str(file), folder=folder, delete_after_upload=True, limit_per_minute=60)
NOTE: Setting limit_per_minute very high will not necessarily make uploads faster overall —
especially if you need to create the packages locally, packages will still queue server-side regardless.
The default of 180 is a reasonable starting point for most deployments.
Combining rate limiting with a progress callback
limit_per_minute works alongside the existing callback parameter, so you can track progress
while still controlling throughput:
from pyPreservica import *

client = UploadAPI()
folder = "9fd239eb-19a3-4a46-9495-40fd9a5d8f93"

packages = list(Path("packages").glob("*.zip"))

for i, file in enumerate(packages, 1):
    print(f"Uploading {file.name} ({i}/{len(packages)})")
    client.upload_zip_package(str(file), folder=folder, callback=UploadProgressConsoleCallback(file), limit_per_minute=60)
Summary
The limit_per_minute parameter gives you straightforward control over upload throughput without
requiring any changes to how packages are created. For most bulk ingest workflows the default of
180 packages per minute is appropriate, but lowering it to 60 or below is recommended when running
large overnight migrations where steady, sustained throughput matters more than raw speed.
05 Jun 2026
MDTO stands for Metagegevens Duurzaam Toegankelijke Overheidsinformatie — roughly translated as “Metadata for Durably Accessible Government Information”.
It is a metadata standard published by the Nationaal Archief (National Archives of the Netherlands).
It defines which metadata fields Dutch government organisations must record alongside their information objects (documents, records, files) to ensure those objects remain findable, usable, and trustworthy over the long term — including after transfer to an archive.
Key concepts it covers
- Identification — how an object is uniquely referenced across systems
- Appraisal & retention — whether a record must be kept permanently or can be destroyed, and when
- Use restrictions — access limitations based on privacy, confidentiality, or other legal grounds
- Provenance — which organisation created or received the record (the archiefvormer)
- Aggregation — how records relate hierarchically (series → dossier → document)
- Representation — linking a logical information object to its physical file(s)
- Events — an audit trail of things that happened to the record (creation, migration, destruction)
MDTO is the successor to TMLO (Toepassingsprofiel Metagegevens Lokale Overheden) and is designed to align with broader standards like DUTO (Duurzaam Toegankelijke Overheidsinformatie, the Dutch government’s overarching requirements framework) and international standards such as Dublin Core, ISAD(G), and PREMIS.
When ingesting Dutch government records into Preservica, MDTO metadata would typically be carried as a descriptive or
custom metadata fragment attached to an asset or folder, allowing the archive to honour Dutch legal
retention and access obligations while benefiting from Preservica’s preservation infrastructure.
ToPX was an early XML-based metadata profile developed for Dutch provinces and municipalities, focused on transferring records to archives in a structured way.
TMLO (Toepassingsprofiel Metagegevens Lokale Overheden) broadened ToPX into a more general profile for local government, still XML-based.
MDTO is the current standard, replacing both, and extending scope to all Dutch government organisations rather than just local authorities.
Many Dutch organisations that have been using Preservica for some years will have ingested content with ToPX metadata.
Migrating to MDTO requires mapping the old ToPX fields to their MDTO equivalents — most concepts carry over, but the XML structure and element names differ.
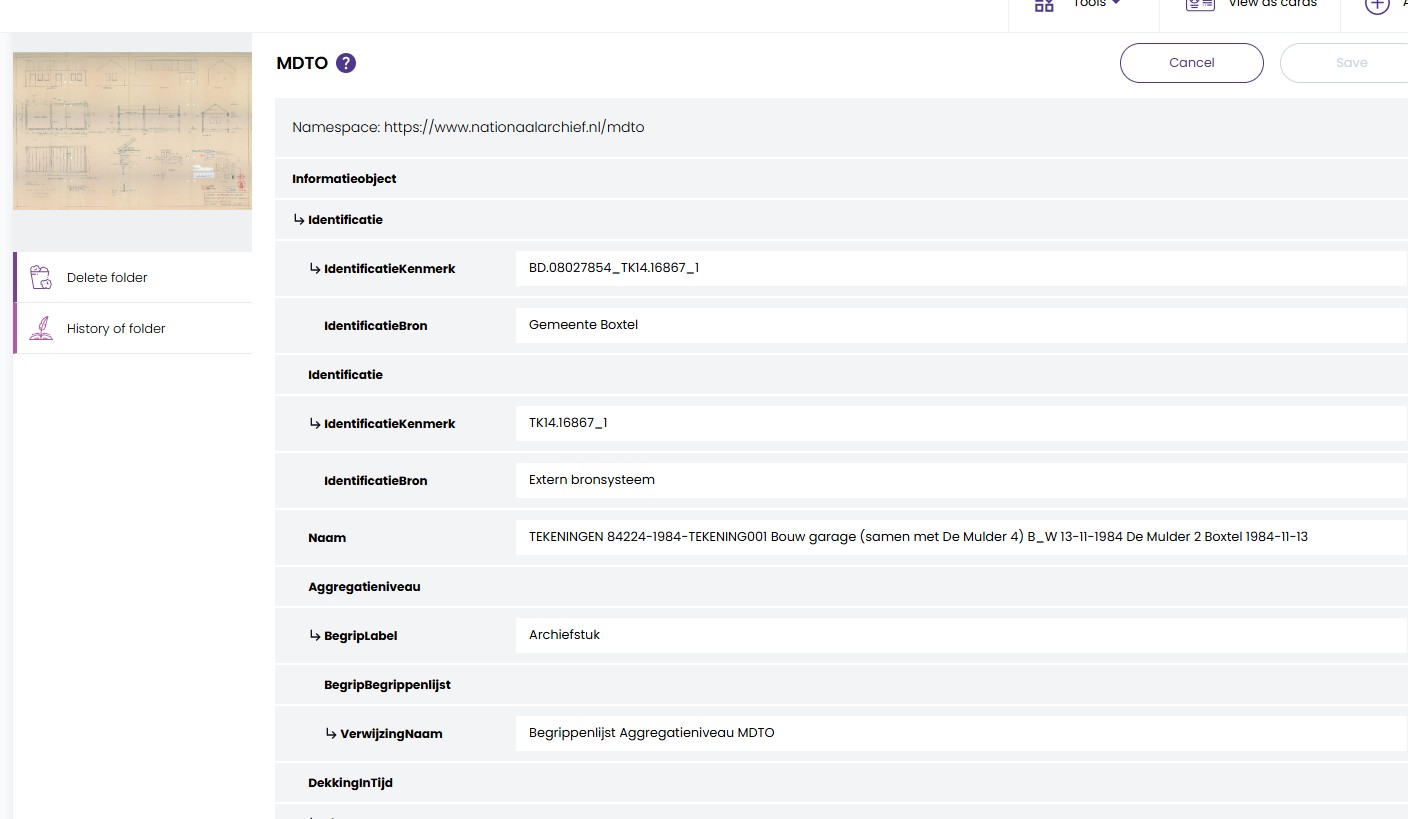
Adding a MDTO XML document to assets in Preservica will allow users to both view and edit the metadata from the user
interface. Preservica will automatically create a default viewer/editor based on the XML provided.
The default viewer takes the metadata attached to the Asset and displays the fields which are part of the XML.
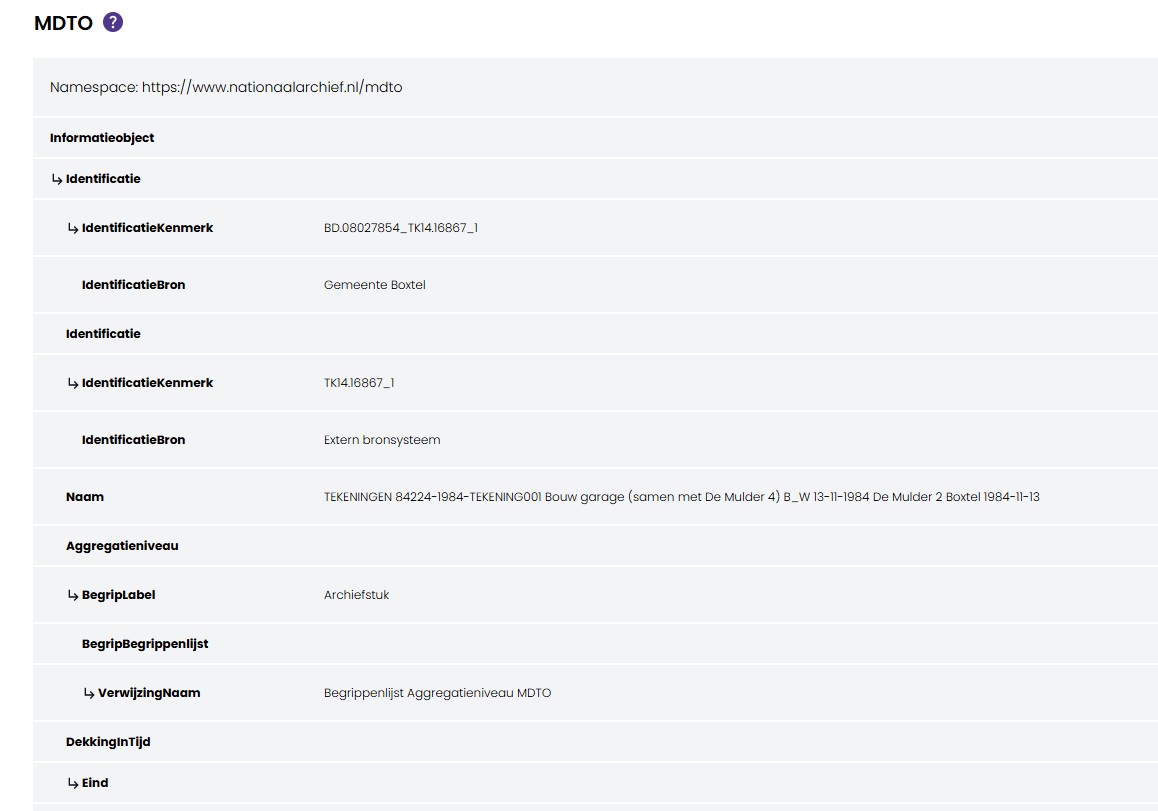
Users only see MDTO fields which exist in that metadata document. This means that they can only edit fields which exist, they
cannot add new fields.
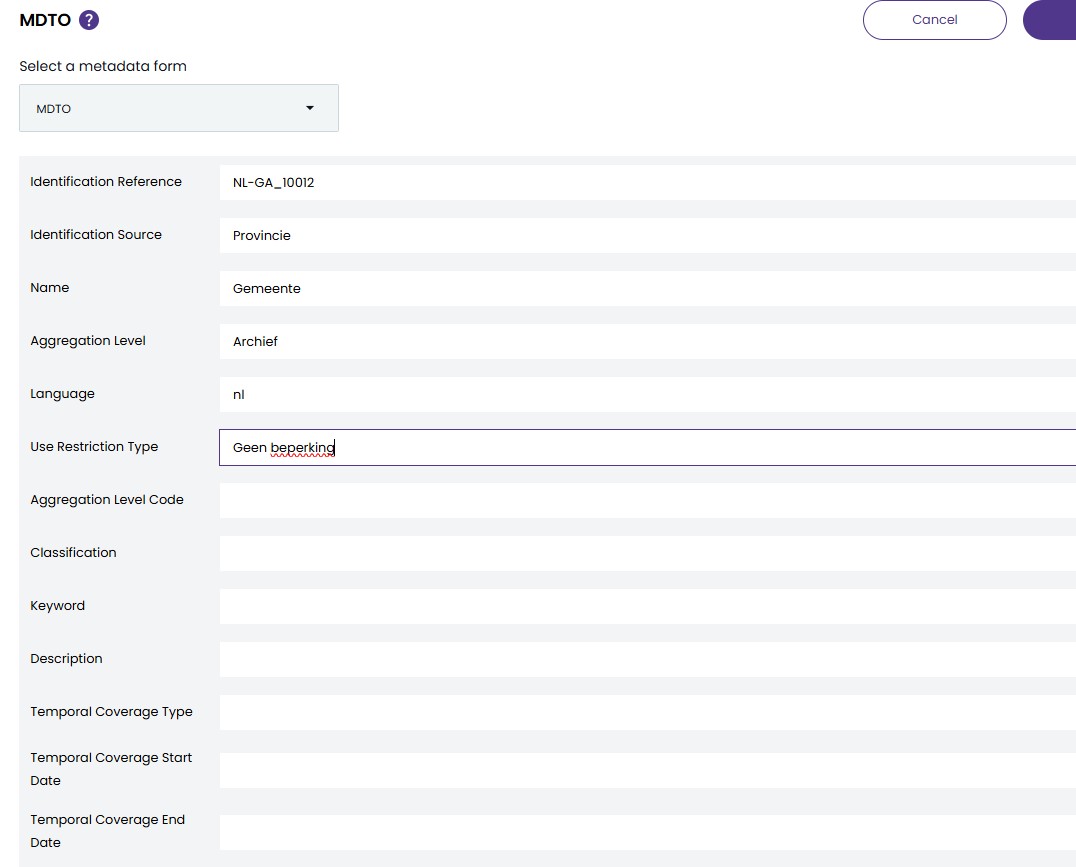
To have a more customised experience with the metadata and allow adding new fields,
a Metadata Form can be added to Preservica.
Before we create the custom form, download the MDTO schema definition and add it to Preservica as an XML schema
MDTO-XML1.0.1.xsd
The MDTO schema can be uploaded via the API
from pyPreservica import *

client = AdminAPI()

with open("MDTO-XML1.0.1.xsd", mode="r", encoding="utf-8") as fd:
    client.add_xml_schema(name="MDTO", description="(MDTO) v1.0.1", originalName="MDTO-XML1.0.1.xsd", xml_data=fd)
The next step is to create a JSON document to represent the form. This should contain a list of fields for each
MDTO element the user would like to view or edit.
Each field has a label which describes the element, mine are in English, but they could be in Dutch if needed.
An XPath expression provides a unique way to describe the element within the XML.
You can choose if the element should be visible and editable. For example some fields you may want to prevent changes to.
An example, with a few MDTO elements is shown below.
{
  "title": "MDTO",
  "description": "(MDTO) v1.0.1",
  "schemaUri": "https://www.nationaalarchief.nl/mdto",
  "default": "True",
  "fields": [
      {
        "label": "Identification Reference",
        "path": "//ns:MDTO/ns:informatieobject/ns:identificatie/ns:identificatieKenmerk",
        "type": "String",
        "visible": "True",
        "editable": "True"
      },
      {
        "label": "Identification Source",
        "path": "//ns:MDTO/ns:informatieobject/ns:identificatie/ns:identificatieBron",
        "type": "String",
        "visible": "True",
        "editable": "True"
      },
      {
        "label": "Name",
        "path": "//ns:MDTO/*/ns:naam",
        "type": "String",
        "visible": "True",
        "editable": "True"
      },
      {
        "label": "Is Representation Of",
        "path": "//ns:MDTO/ns:bestand/ns:isRepresentatieVan/ns:verwijzingNaam",
        "type": "String",
        "visible": "True",
        "editable": "True"
      },
      {
        "label": "Is Representation Of  Identifier",
        "path": "//ns:MDTO/ns:bestand/ns:isRepresentatieVan/ns:verwijzingIdentificatie/ns:identificatieKenmerk",
        "type": "String",
        "visible": "True",
        "editable": "True"
      }
  ]
}
You can download a full MDTO JSON file from here
The JSON form can be uploaded via the following script.
from pyPreservica import *

client = MetadataGroupsAPI()

client.add_form(json_form=json.load(open('mdto_metadata_group.json')))
The form will then automatically be used on any Asset with MDTO metadata.
This will allow users to add values to new fields.
02 Feb 2026
Unlocking Automation with Preservica Webhooks
In the world of digital preservation, automation and interoperability are key to building scalable, responsive workflows.
With the introduction of webhooks in Preservica v6.8, organizations now have a powerful tool to trigger
real-time actions based on repository events—without the need for constant polling.
What Are Preservica Webhooks?
Webhooks are event-driven HTTP callbacks. When a specific event occurs in Preservica—such as an asset being ingested
or moved—the system sends an HTTP POST request to a pre-configured URL.
This allows external systems to react instantly, enabling seamless integration and automation.
Unlike traditional APIs that require clients to poll for updates, webhooks push data out as events happen.
This shift from pull to push architecture is ideal for building responsive, scalable workflows.
For more detailed information on Preservica webhooks we have a previous blog post.
Generating the webhooks takes place automatically from Preservica; to build applications we need
infrastructure to consume the webhook and take actions based on the information sent by Preservica.
In this blog post we are going to describe how we can build applications that use Amazon Web Services (AWS).
AWS is a good choice for consuming webhooks due to its scalability, reliability,
and rich set of services that make it easy to build secure, event-driven architectures. We showed
how we can easily deploy a serverless application using AWS Lambda and API Gateway
to consume Preservica webhooks.
The AI Application
The application we are going to build is designed to support a key responsibility of an archivist,
that is the creation of document descriptions in Preservica to support the creation of finding aids and
catalogue entries of historic material.
Good descriptions help researchers, and the public understand what the documents are, why they matter, and how to access them.
Archivists may often write summaries, historical notes, or contextual essays to help non-specialists understand the
significance of the materials and supporting that process through AI can reduce the workload of the archivist.
The aim of this webhook application is to update Preservica with descriptive metadata about digitised documents
automatically as they are ingested into Preservica.
The descriptions will be generated using what is called a foundational inference model,
the model will be supplied both the text of the document and a prompt,
the prompt will be some request we would like the model to carry out. For example, we could ask:
“Create a two-paragraph archival description of this document for use in an archive”
We would send both the prompt and document text to the model.
The model will be executed within a secure managed framework called Amazon Bedrock,
which will let us try out different models from leading AI companies and Amazon through a unified API.
Bedrock then returns the result which in this case is a two-paragraph description of the document which is then sent
to Preservica.
One extra step we are going to include is a request to OCR
the digitised documents, this will extract the text from within the image,
without this step we will not have any input to send to the AI model. The OCR step is going to use the AWS Textract,
this service allows us to send a image of a document and retrieve the text within the image.
To orchestrate the whole process, we do need a small amount of glue code which will fetch the document from Preservica,
send the document text to Bedrock and send the final result back to Preservica.
To provide this glue code we are going to be using AWS Lambda.
AWS Lambda is a serverless compute service provided by Amazon Web Services that lets you run code
without provisioning or managing servers. This is useful because we do not need to deploy or run any servers to
build this application.
AWS Lambda supports multiple programming languages, for this example application we are going to use
Python this allows us to make use of the 3rd party Preservica SDK pyPreservica
library for interacting with Preservica and the AWS Boto3
library for making requests to AWS services. For more details on how to build the Lambda function and
deploy it using Zappa see the blog post.
The last part of the application is a web service which will receive the webhook requests from Preservica and trigger
the AWS lambda code to start the process.
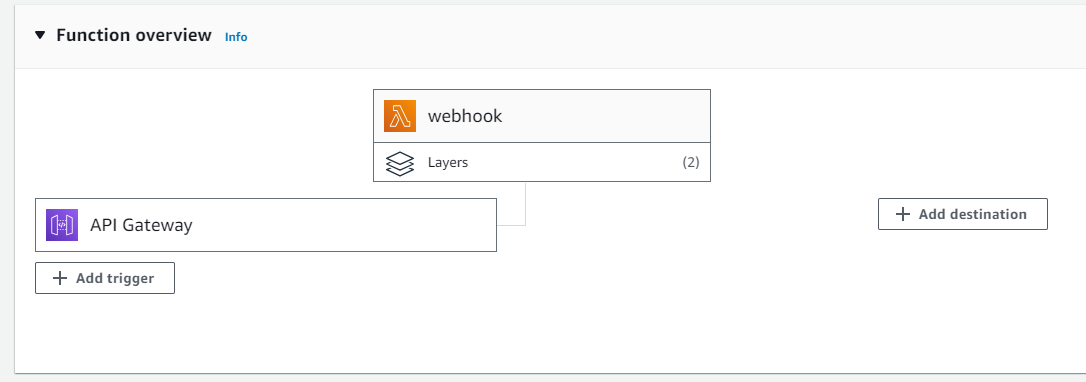
The component we are going to use for this is AWS API Gateway.
API Gateway is going to acts as a front door for our application, it will provide the URL which we need to
configure the webhook in Preservica and will validate requests and trigger our Lambda function with the entity
reference of the newly ingested document.
We have now specified all the services we require to build the application. The workflow is shown in the diagram below:
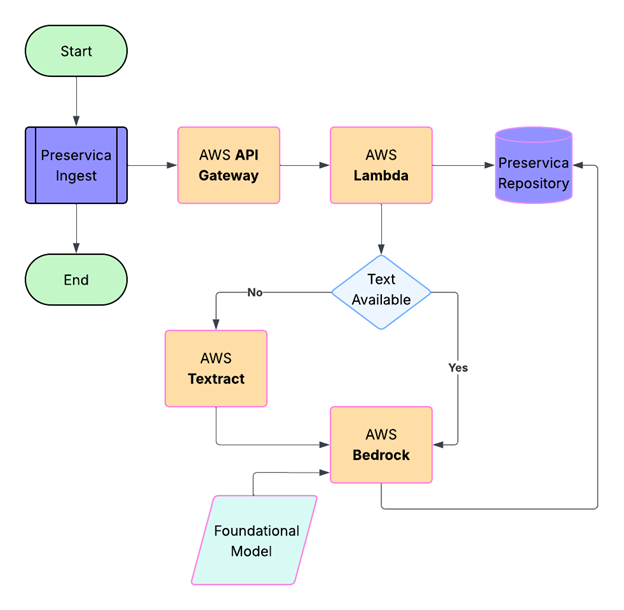
The Implementation
A user drops a digitised document into a Preservica folder using the simple drag and drop feature,
the image is ingested normally and at the end of the ingest process the webhook is sent to the
API Gateway as a HTTPS POST request, containing a JSON payload which includes the Preservica reference
of the ingested document. Note, the document itself is not sent, only its internal Preservica ID.
The API Gateway then triggers the Lambda function passing the Preservica reference to a Python Lambda function.
The first part of the Lambda function queries Preservica to determine what kind of object has been ingested,
if the object is an image it will need to be OCR’d first.
We use the Python Imaging Library Pillow to create an image object from the Preservica bytestream.
This image object is then sent to AWS Textract which returns a text string.
The OCR text is also stored as descriptive metadata fragment on the Asset.
The following code snippet shows how we can use the pyPreservica SDK to
retrieve the bitstream of the ingested document,
create an image object and send it to Textract for OCR processing.
The resulting text is then stored as a metadata fragment on the Asset.
TEXT_NS = "http://www.preservica.com/metadata/group/ai_ocr_text"

from pyPreservica import *
from textractor import Textractor

preservica_client = EntityAPI()

def text_extract(asset: Asset):
    extractor = Textractor(region_name="eu-west-1")
    for bs in preservica_client.bitstreams_for_asset(asset):
        if (bs.filename.lower().endswith("png")) or (bs.filename.lower().endswith("jpg")):
            image = Image.open(preservica_client.bitstream_bytes(bs))
            document = extractor.detect_document_text(file_source=image)
            xml_response = f"""<ai_ocr_text xmlns="{TEXT_NS}" xmlns:xsi="http://www.w3.org/2001/XMLSchema-instance">
                <text>{escape(document.text)}</text>
                </ai_ocr_text>"""
            preservica_client.add_metadata_as_fragment(asset, TEXT_NS, xml_response)
            return document.text
The OCR text is then combined with the prompt above and sent to a foundational model within Bedrock,
the model analyses the text and returns the document summary.
This summary is then written back into the description field of the Preservica Asset.
AWS Bedrock is Amazon Web Services’ fully managed generative AI platform that lets you build and scale AI applications
using Foundation Models (FMs)—without managing any infrastructure.
It provides access to many leading AI models (e.g., Amazon Titan, Anthropic Claude, Stability AI,
Meta, Mistral, Cohere, etc.) through a single API.
Bedrock provides built‑in guardrails help block harmful content and reduce hallucinations,
offering enterprise‑grade security and compliance.
The following code snippet shows how we can use the Boto3 library to send a request to Bedrock using
the anthropic claude foundation model to generate a
summary of the document text which can write the result back to Preservica.
def summarise_with_claude(text: str):

    client = boto3.client("bedrock-runtime", region_name="eu-west-1")

    model_id = "eu.anthropic.claude-sonnet-4-20250514-v1:0"

    prompt: str = "Summarise the following historical text into only two paragraphs: "

    # Format the request payload using the model's native structure.
    native_request = {
        "anthropic_version": "bedrock-2023-05-31",
        "max_tokens": 1024,
        "temperature": 0.5,
        "messages": [
            {
                "role": "user",
                "content": [{"type": "text", "text": prompt + text}],
            }
        ],
    }

    # Convert the native request to JSON.
    request = json.dumps(native_request)

    try:
        # Invoke the model with the request.
        response = client.invoke_model(modelId=model_id, body=request)

    except (ClientError, Exception) as e:
        print(f"ERROR: Can't invoke '{model_id}'. Reason: {e}")
        return ""

    # Decode the response body.
    model_response = json.loads(response["body"].read())

    # Extract and print the response text.
    response_text = model_response["content"][0]["text"]

    if prompt in response_text:
            response_text = response_text.replace(prompt, "")


    return response_text
The parameter temperature is set to 0.5, this controls the creativity of the response,
lower values will produce more deterministic responses, while higher values will produce more creative responses.
The Results
The following are the results of the AI workflow on two different digitised documents.
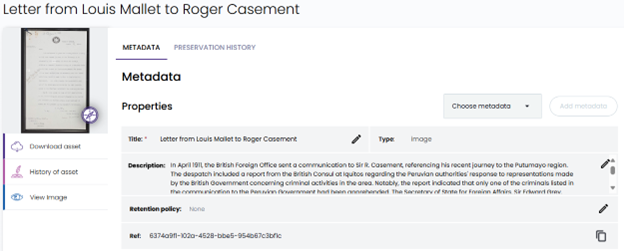
The generated summary text returned from the model has been saved back into the description field of the Preservica Asset,
this is then visible in the Preservica user interface as shown below.
Example 1
“Letter from Louis Mallet to Roger Casement”
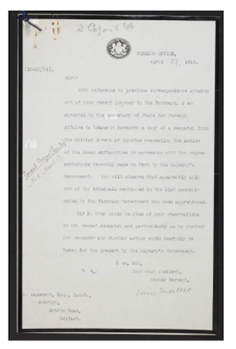
The AI generated description:
In April 1911, the British Foreign Office sent a communication to Sir R. Casement,
referencing his recent journey to the Putumayo region. The despatch included a report from the British
Consul at Iquitos regarding the Peruvian authorities’ response to representations made by the British
Government concerning criminal activities in the area. Notably, the report indicated that only one of the
criminals listed in the communication to the Peruvian Government had been apprehended.
The Secretary of State for Foreign Affairs, Sir Edward Grey, sought Casement’s insights on the Consul’s despatch,
specifically whether further action could be beneficially undertaken by the British Government at that time.
The Foreign Office’s communication underscored the limited progress made by Peruvian authorities
in addressing the issues raised, prompting a call for Casement’s expert opinion on potential next steps.
The correspondence highlights the ongoing concern and diplomatic efforts by the British Government to
ensure justice and accountability in the Putumayo region.
How it appears in Preservica:
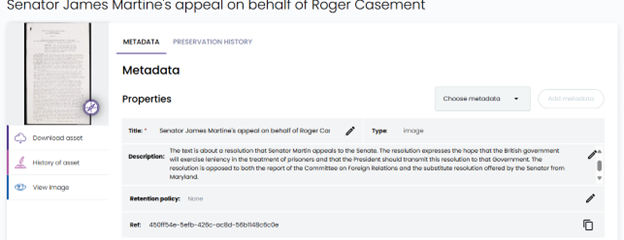
Example 2
“Senator James Martine’s appeal on behalf of Roger Casement”

The AI generated description:
The text is about a resolution that Senator Martin appeals to the Senate.
The resolution expresses the hope that the British government will exercise leniency
in the treatment of prisoners and that the President should transmit this resolution to that Government.
The resolution is opposed to both the report of the Committee on Foreign Relations and the substitute
resolution offered by the Senator from Maryland.
How it appears in Preservica:
24 Jan 2026
Introduction
In a previous post I described how Preservica can use webhook notifications to allow the creation of custom business processes.
At the end of the article I touched upon the challenges of hosting and securing webhook endpoints,
and the manual effort required to deploy the supporting infrastructure.
We can reduce the cost and work of running dedicated hardware and
web servers by using a serverless architecture within AWS but this does require a level of AWS knowledge
to connect together all the required services.
With a serverless architecture you only pay for the milliseconds of server time that you use,
so it’s many orders of magnitude cheaper than regular hosting options.
This post describes a method to simplify the development of web services which will receive the Preservica webbooks
and a method to automate the process of creating the required AWS services,
such as the AWS Lambda function and API Gateway.
Background
We are going to use three Python projects: the web framework Flask to manage the application logic and create
the web service which processes the messages from Preservica.
The deployment of the Flask application to AWS including the creation of a Lambda function and the API Gateway will be done using Zappa.
The webhook handshake logic and the interaction with Preservica will be done using pyPreservica.
Flask
Flask is often described as a micro web framework for Python.
Flask is famous for its “Hello World” being only a few lines of code. It uses Python decorators to handle routes, making the code highly readable.
from flask import Flask

app = Flask(__name__)

@app.route("/")
def home():
    return "Hello, Flask!"
This simplicity makes it ideal for creating the business logic of the webhook service.
The code that handles the webhook messages will be within the Flask application.
Zappa
Zappa is an open-source tool designed to “Lambda-fy” Python web applications. It allows you to deploy any WSGI-compatible application (like Flask) to AWS Lambda and API Gateway with almost zero configuration.
Essentially, Zappa acts as a bridge: it packages your entire Python project, handles the complex AWS infrastructure setup, and translates incoming API Gateway requests into a format your Flask application can understand.
By using Zappa, you no longer need to log in to AWS and deploy Lambda functions, API Gateways, IAM roles, and all the AWS resources required to set up the serverless environment. No AWS knowledge is required.
pyPreservica
pyPreservica is an open-source Python Software Development Kit (SDK) and client library designed to interact with the Preservica API.
It is the primary tool for archivists, developers, and records managers who want to use the Preservica API.
pyPreservica is used to convert the messages from Preservica into Assets that can be processed within the webhook.
Getting Started
We are going to create a simple web application for receiving Preservica webhook notifications and deploy it within AWS.
We will use a virtual environment to manage the dependencies for our project.
We will create a project folder called webhooks and a .venv folder within it:
$ mkdir webhooks
$ cd webhooks
$ python3 -m venv .venv
Before you work on your project, activate the corresponding environment:
Within the virtual environment, use the following command to install Flask:
Flask is now installed.
The next step is to create the application logic. Create a new file called app.py in the project folder and copy the following code into it:
from flask import Flask

app = Flask(__name__)

@app.route("/")
def index():
    return "<p>Hello, World!</p>"
This will create a minimal application which will return a basic HTML string when a URL is accessed through a browser.
We are now going to deploy the test application to AWS using Zappa. Because we are going to deploy within AWS, you will need a valid AWS account and some API keys in a credentials file.
The AWS credentials file should contain an access key and a secret key.
After your AWS credentials are set up, we can deploy Zappa:
Once installed, we can run Zappa to detect the application and create our settings file:
This will prompt you to answer a few simple questions, for this example we can except the default “dev” stage, the S3 bucket name, the app.app name.
When asked if the application should be deployed globally we can say no.
Once you finish initialization, you’ll have a file named zappa_settings.json in your project directory defining your basic deployment settings. It will probably look something like this:
{
    "dev": {
        "app_function": "app.app",
        "aws_region": "us-east-1",
        "exclude": [
            "boto3",
            "dateutil",
            "botocore",
            "s3transfer",
            "concurrent"
        ],
        "profile_name": "default",
        "project_name": "webhooks",
        "runtime": "python3.13",
        "s3_bucket": "zappa-nquhdelye"
    }
}
Once your settings are configured, you can package and deploy your application to AWS with a single command:
If you get an error at this stage, it will probably be because your AWS API key does not have sufficient privileges.
You should see some output followed by the deployed URL.
INFO:Uploading webhooks-dev-1769437524.zip (9.9MiB).
...
INFO:Deploying API Gateway..
INFO:Waiting for lambda function [webhooks-dev] to be updated...
Deployment complete!: https://8hxhcmrjd2.execute-api.us-east-1.amazonaws.com/dev
If you now visit the URL shown in your console, then you should see the text Hello, World! in the browser.
Validating the Messages
During the webhook subscription process, Preservica will send a challenge response message to the specified endpoint URL to
verify that it exists, and it’s publicly accessible.
Preservica sends a POST request to the URL with a challengeCode query parameter.
The server must respond with the expected challenge response or the subscription will fail.
The response sent back to Preservica takes the form of a simple json document which includes the original challenge
code and a hexHmac256Response which is a hexadecimal encoded hmac256 of the challenge Code using the shared secret as the hmac key.
In the previous post on Preservica webhooks we showed how we could write code to manage this verification process
directly within a AWS Lambda function, in this example we are going to add some simple calls into the
pyPreservica library into our web service to perform the handshake challenge.
First we add pyPreservica to our Project:
$ pip install pyPreservica
Now we can update the flask application to respond to the challenge.
Since Preservica will only send webhook messages using HTTP POST, we can limit our service to ignore other requests such as GET etc.
from flask import Flask

app = Flask(__name__)

@app.route('/', methods=['POST'])
def index():
    return "<p>Hello, World!</p>"
The next step is to add the pyPreservica import statement and the FlaskWebhookHandler.
import os
from flask import Flask, request
from pyPreservica import FlaskWebhookHandler

app = Flask(__name__)

@app.route('/', methods=['POST'])
def index():
    webhook = FlaskWebhookHandler(request, os.environ.get('WEBHOOK_SECRET'))
    if webhook.is_challenge():
        return webhook.verify_challenge()

    return webhook.response_ok()
We can now test for initial handshake and return the message Preservica is expecting to allow the successful registration of the webhook.
The WEBHOOK_SECRET is an environment variable which contains a shared secret between the web hook service and
the Preservica system. This can be used to verify any messages received by the web hook service did actually
come from Preservica.
The shared secret should be a strong password which cannot be guessed. To make sure the service can access
the secret we will add it to the AWS environment variables.
Update the zappa_settings.json file by adding a aws_environment_variables entry and your secret password.
{
    "dev": {
        "app_function": "app.app",
        "aws_region": "us-east-1",
        "exclude": [
            "boto3",
            "dateutil",
            "botocore",
            "s3transfer",
            "concurrent"
        ],
        "profile_name": "default",
        "project_name": "webhooks",
        "runtime": "python3.13",
        "s3_bucket": "zappa-nq6p2nr48",

        "aws_environment_variables": {
            "WEBHOOK_SECRET": "EB9WJjYDkckyET3VM70r"
        }
    }
}
We can update the application using
INFO:Unscheduled webhooks-dev-zappa-keep-warm-handler.keep_warm_callback.
INFO:Scheduled webhooks-dev-zappa-keep-warm-handler.keep_warm_callback with expression rate(4 minutes)!
INFO:Waiting for lambda function [webhooks-dev] to be updated...
Your updated Zappa deployment is live!: https://8hxhcmrjd2.execute-api.us-east-1.amazonaws.com/dev
Creating the Subscription
At this point we have a webhook service deployed in AWS waiting for a challenge request from Preservica.
The handshake only occurs when a new webhook subscription is created by preservica, so that is what we will do next.
Create a new python script called subscribe.py in a folder outside your project, create a pyPreservica WebHooksAPI API client and
call the subscribe() function, pass the URL generated by zappa, the trigger type you want to subscribe to (Ingest events)
in this case and the webhook secret you created earlier.
For details on authenticating the pyPreservica WebHooksAPI call see https://pypreservica.readthedocs.io/en/latest/intro.html#authentication
from pyPreservica import WebHooksAPI, TriggerType

client = WebHooksAPI()

sub = client.subscribe(url="https://7k6anj0k99.execute-api.us-east-1.amazonaws.com/dev", triggerType=TriggerType.INDEXED, secret="EB9WJjYDkckyET3VM70r")
print(sub)
Run this script to create the subscription, from this point everything ingested into Preservica will trigger a webhook event.
$ python3 subscribe.py

{"id":"4583e1e6d2c72ed96a1151bc7dfd53c2","url":"https://8hxhcmrjd2.execute-api.us-east-1.amazonaws.com/dev","triggerType":"FULL_TEXT_INDEXED","includeIdentifiers":true}
Creating the Application
We have a web hook application which can successfully respond to subscription requests, but cannot do much else.
The next step is to add some application logic to determine which Assets have been ingested.
Update the Flask application code to process the incoming requests and use the Preservica Content API to fetch
information about the Preservica objects.
The process_request() method is a generator which returns a dictionary for every object which is part of the webhook event.
We can pass the entity type and entity ref from the Preservica event into the ContentAPI.object_details() method to
get information about this Preservica object.
import os
from flask import Flask, request
from pyPreservica import FlaskWebhookHandler, ContentAPI

client = ContentAPI()

app = Flask(__name__)

@app.route('/', methods=['POST'])
def index():
    webhook = FlaskWebhookHandler(request, os.environ.get('WEBHOOK_SECRET'))
    if webhook.is_challenge():
        return webhook.verify_challenge()
    else:
        for obj_details in webhook.process_request():
            entity = client.object_details(obj_details["entityType"], obj_details["entityRef"])
            print(entity)

    return webhook.response_ok()
This application will now print the details into the AWS logs of every entity, Asset or Folder which is ingested into Preservica.
We can now update our AWS service again. But before we do we need to provide credentials to the pyPreservica library.
Add your Preservica username, password and server hostname to the zappa_settings.json file within the
aws environment variables parameter.
{
    "dev": {
        "s3_bucket": "lambda",
        "app_function": "app.app",

        "aws_environment_variables": {
            "WEBHOOK_SECRET": "EB9WJjYDkckyET3VM70r",
            "PRESERVICA_PASSWORD": "1234567",
            "PRESERVICA_SERVER":  "uk.preservica.com",
            "PRESERVICA_USERNAME": "email@test.com"
        }
    }
}
Redeploy using zappa
and we can monitor the AWS logs locally using:
Ingest a document into your preservica system, and you should see the details appear on your console.
Extending the Application
We now have a functioning web service which can validate subscriptions and handle Preservica events such as ingest etc.
The next step is to build out your application, the following example fetches every
thumbnail image and copies it to an S3 bucket for each new Asset ingest.
import os
import io
from flask import Flask, request
import boto3
from pyPreservica import FlaskWebhookHandler, ContentAPI, EntityType, Thumbnail

client = ContentAPI()

app = Flask(__name__)


@app.route('/', methods=['POST'])
def index():
    webhook = FlaskWebhookHandler(request, os.environ.get('WEBHOOK_SECRET'))
    if webhook.is_challenge():
        return webhook.verify_challenge()
    else:
        s3_client: boto3.s3 = boto3.client('s3')
        for obj_details in webhook.process_request():
            if obj_details["entityType"] == EntityType.ASSET.value:
                buffer: io.BytesIO = client.thumbnail_bytes(obj_details["entityType"], obj_details["entityRef"], Thumbnail.MEDIUM)
                s3_client.put_object(Bucket="my_s3_bucket", Key=f"{obj_details["entityRef"]}/thumbnail.png", Body=buffer.getvalue())


    return webhook.response_ok()
10 Jun 2023
This article is a based on the talk of the same name given to the 2023 Preservica User Group in Oxford.
Introduction to webhooks and APIs
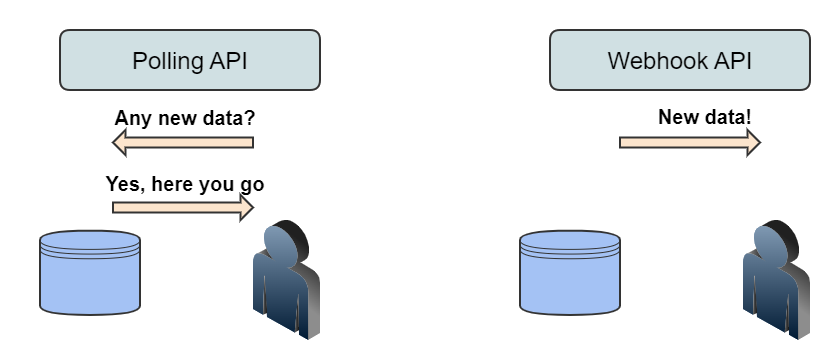
Webhooks are a type of API which allow apps to stay up-to-date with real-time information. Webhooks are
also called event-driven APIs and are typically used to provide other applications with real-time data.
Using webhooks, applications can send data automatically to 3rd party systems when certain events are triggered within
an application. Unlike the traditional process of “polling” in which a client asks the application if anything has
changed, web hooks automatically send out information to subscribed systems when certain events have happened.
Preservica Webhooks
Webhooks are a new API introduced in Preservica v6.8. They are based on a publisher-subscriber pattern.
Preservica is the publisher and will send messages to all registered subscribers when certain events are
triggered within the system.
The key difference between webhooks and traditional APIs is Who triggers the process.
With traditional APIs the trigger is an event outside Preservica and with webhooks the trigger is an
event inside Preservica. The result is that you do not have to continually poll Preservica to get new information.
This allows users to build custom business processes and workflows which are triggered based on events within Preservica.
Webhooks work best when you need to take some action when something new has happened within Preservica.
Preservica has provided two events as part of the first webhook release with Preservica v6.8. More events will be
added in future versions.
- Ingesting Assets
- Moving Assets
Webhook Documentation
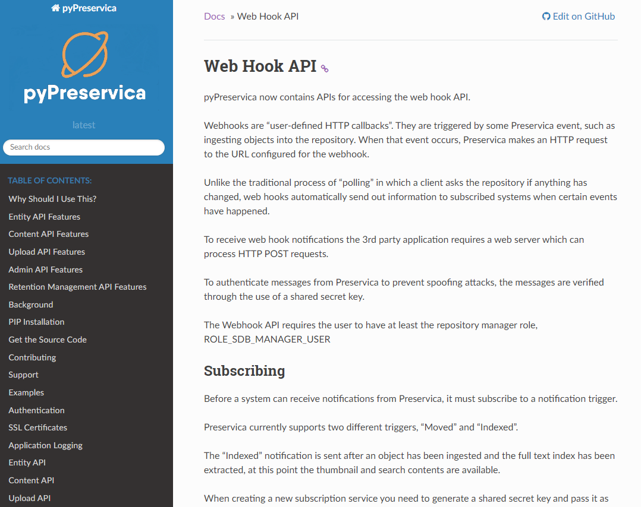
The webhook API is documented in the official Preservica Swagger pages
and the 3rd party pyPreservica Python SDK
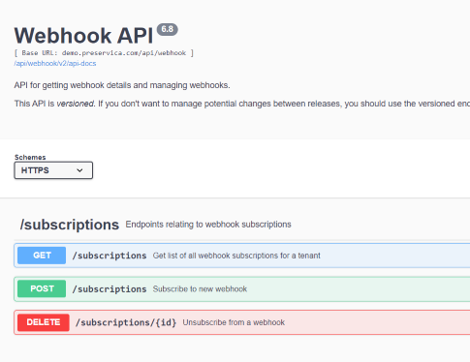
The following examples below will use the Preservica SDK pyPreservica
Subscribing
Before a system can receive notifications from Preservica, it must subscribe to a notification trigger.
When creating a new subscription service, you need to generate a shared secret and pass it as an argument to the
subscribe method. This is then used by the subscriber to verify the messages sent by Preservica (publisher) are genuine
(to prevent spoofing attacks). Its known as a shared secret because its held by both the publisher (Preservica) and
the subscriber (web hook server).
Using the PyPreservica SDK to create a new subscription for Ingested events, you pass the address of a web service which
can receive HTTP POST requests. This could be a web server or some API gateway service. If you use a web server it
must provide a publicly accessible endpoint. If you are running a local server for testing purposes it will need to use some
kind of ingress service to make it publicly accessible.
Along with the URL and the shared secret, you need to pass an argument which specifies which type of even you are interested in.
The INDEXED event is triggered at the end of the ingest process after the content has been full text indexed and
thumbnails are available.
To use the Preservica Webhook API requires the user making the API call
to have at least the repository manager role, ROLE_SDB_MANAGER_USER
The following pyPreservica python script for creating a new subscription is
from pyPreservica import WebHooksAPI

webhook = WebHooksAPI()

subscription = webhook.subscribe("http://my-preservica-webhook.com:8080", TriggerType.INDEXED, "my secret key!")
where http://my-preservica-webhook.com:8080 is the web hook endpoint URL.
During the subscription process, Preservica will send a challenge response message to the specified
endpoint URL to verify that it exists and its publicly accessible.
Preservica sends a POST request to the URL with a challengeCode query parameter.
The server must respond with the expected challenge response or the subscription will fail.
The response sent back to Preservica takes the form of a simple json document which includes the original challenge
code and a hexHmac256Response which is a hexadecimal encoded hmac256 of the challenge Code using the shared secret as the hmac key.
{
  "challengeCode": "challengeCode",
  "challengeResponse": "hexHmac256Response"
}
Therefore, the web hook process will need a copy of the secret key to verify requests.
Receiving Events
To receive web hook notifications pyPreservica provides a reference web server implementation which includes
support for the negotiation of the challenge request handshake during the subscription request and
verification of each subsequent webhook event.
To implement the web server, extend the base class WebHookHandler from the SDK and implement a
single method do_WORK() this method is called every time Preservica calls the web hook.
This method is therefore where any processing takes place. This method is passed a python dict object containing
information about the event such as Asset references etc.
class MyWebhook(WebHookHandler):
  def do_WORK(event):
    # Do something useful
The handler can then be used to create a web server, the web server should be run from the same directory as a
pyPreservica credential.properties file containing the shared secret which was used earlier to create
the web hook subscription.
The WebHookHandler extends the standard Python BaseHTTPRequestHandler base class and will provide the handshake and
message verification automatically. Only verified messages are actioned. This class is part of the pyPreservica SDK.
class WebHookHandler(BaseHTTPRequestHandler):
    """
    A sample web hook web server which provides handshake verification
    The shared secret key is passed in via the HTTPServer

    Extend the class and implement do_WORK() method
    The JSON document is passed into do_WORK()

    """

    def hmac(self, key, message):
        return hmac.new(key=bytes(key, 'latin-1'), msg=bytes(message, 'latin-1'), digestmod=hashlib.sha256).hexdigest()

    def do_POST(self):
        result = urlparse(self.path)
        q = parse_qs(result.query)
        if 'challengeCode' in q:
            code = q['challengeCode'][0]
            signature = self.hmac(self.server.secret_key, code)
            response = f'{{ "challengeCode": "{code}", "challengeResponse": "{signature}" }}'
            self.send_response(200)
            self.send_header("Content-type", "application/json")
            self.end_headers()
            self.wfile.write(bytes(response.encode('utf-8')))
            self.log_message(f"Handshake Completed. {response.encode('utf-8')}")
        else:
            verif_sig = self.headers.get("Preservica-Signature", None)
            if "chunked" in self.headers.get("Transfer-Encoding", "") and (verif_sig is not None):
                payload = ""
                while True:
                    line = self.rfile.readline().strip()
                    chunk_length = int(line, 16)
                    if chunk_length != 0:
                        chunk = self.rfile.read(chunk_length)
                        payload = payload + chunk.decode("utf-8")
                    self.rfile.readline()
                    if chunk_length == 0:
                        verify_body = f"preservica-webhook-auth{payload}"
                        signature = self.hmac(self.server.secret_key, verify_body)
                        if signature == verif_sig:
                            self.log_message("Signature Verified. Doing Work...")
                            self.log_message(payload)
                            self.send_response(200)
                            self.end_headers()
                            self.do_WORK(json.loads(payload))
                        break
The following is an example Python web server which can respond to Preservica web hooks.
In this example the web hook server downloads the thumbnail image for every ingested asset.
from http.server import HTTPServer
from sys import argv
from pyPreservica import *

BIND_HOST = '0.0.0.0'
PORT = 8080


class MyWebHook(WebHookHandler):
    def do_WORK(self, event):
        for reference in list(event['events']):
            ref = reference['entityRef']
            asset = self.server.client.asset(ref)
            self.server.client.thumbnail(asset, f"{ref}.jpg")


if __name__ == '__main__':

    config = configparser.ConfigParser(interpolation=configparser.Interpolation())
    config.read('credentials.properties', encoding='utf-8')
    secret_key = config['credentials']['secret.key']

    if len(argv) > 1:
        arg = argv[1].split(':')
        BIND_HOST = arg[0]
        PORT = int(arg[1])

    print(f'Listening on http://{BIND_HOST}:{PORT}\n')

    httpd = HTTPServer((BIND_HOST, PORT), MyWebHook)
    httpd.secret_key = secret_key
    httpd.client = EntityAPI()
    httpd.serve_forever()
The web server can be then be started from the command line using.
$ python3 server.py 0.0.0.0:8000
Use Cases
The typical use case for web hooks is when you want to take some action after new material has been ingested into
Preservica. For example, you may wish to add additional descriptive metadata to an Asset from an external metadata
management system. The list below provides a few examples of where a web hook may be more appropriate than a traditional
polling API.
- Catalogue lookup after ingest
- Transcribe video or audio after ingesting AV material
- Send an automatically created access version of an Asset to a discovery platform
Microsoft Teams Integration
This use case shows how we can chain webhooks together to allow 3rd party systems to communicate with each other.
We are going to use Microsoft Teams as the 3rd party system as Teams provides incoming webhook functionality.
We can connect an outgoing Preservica webhook to an incoming teams webhook to transfer information into Teams.
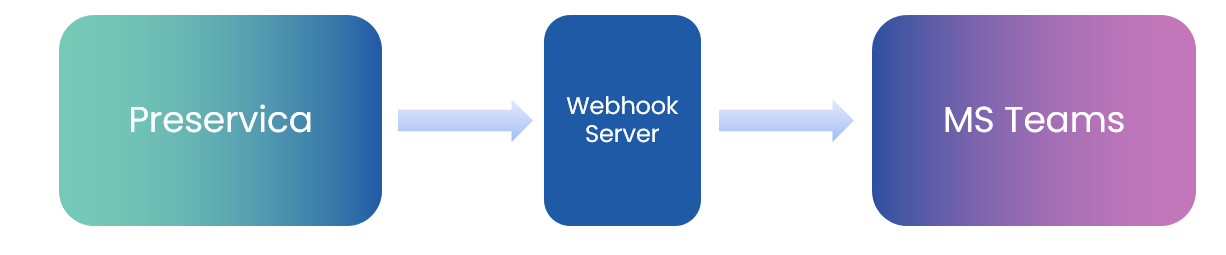
The end result is that every Asset ingested into Preservica will automatically
send a notification into a Microsoft Teams channel.
We will use the python library pymsteams to help create the
messages
Our web hook server now looks like:
from http.server import HTTPServer
from sys import argv
from pyPreservica import *
import pymsteams

BIND_HOST = '0.0.0.0'
PORT = 8080

class MyWebHook(WebHookHandler):

    def teams_message(self, asset):
        myTeamsMessage = pymsteams.connectorcard(self.server.teams_url)
        myTeamsMessage.color("red")
        # create the section
        myMessageSection = pymsteams.cardsection()
        myTeamsMessage.title("Preservica has ingested a new asset")

        # Section Title
        myMessageSection.title(asset.title)
        # Facts are key value pairs displayed in a list.
        myMessageSection.addFact("Asset Title", asset.title)
        myMessageSection.addFact("Asset Description", asset.description)

        for bitstream in self.server.client.bitstreams_for_asset(asset):
            myMessageSection.addFact("BitStream Name",  bitstream.filename)
            myMessageSection.addFact("BitStream Length", f"{bitstream.length} Bytes")

        # Section Text
        myMessageSection.text("Asset Metadata")
        # Section Images
        myMessageSection.addImage(f"https://ua.access.preservica.com/download/thumbnail/IO_{asset.reference}")
        # Add your section to the connector card object before sending
        myTeamsMessage.addSection(myMessageSection)
        myTeamsMessage.addLinkButton("View the Asset in UA", f"https://ua.access.preservica.com/uncategorized/IO_{asset.reference}")
        myTeamsMessage.summary("Test Message")

        myTeamsMessage.send()


    def do_WORK(self, event):
        for reference in list(event['events']):
            ref = reference['entityRef']
            asset = self.server.client.asset(ref)
            self.teams_message(asset)

if __name__ == '__main__':

    config = configparser.ConfigParser(interpolation=configparser.Interpolation())
    config.read('credentials.properties', encoding='utf-8')
    secret_key = config['credentials']['secret.key']

    if len(argv) > 1:
        arg = argv[1].split(':')
        BIND_HOST = arg[0]
        PORT = int(arg[1])

    print(f'Listening on http://{BIND_HOST}:{PORT}\n')

    httpd = HTTPServer((BIND_HOST, PORT), MyWebHook)
    httpd.secret_key = secret_key
    httpd.client = EntityAPI()
    httpd.serve_forever()
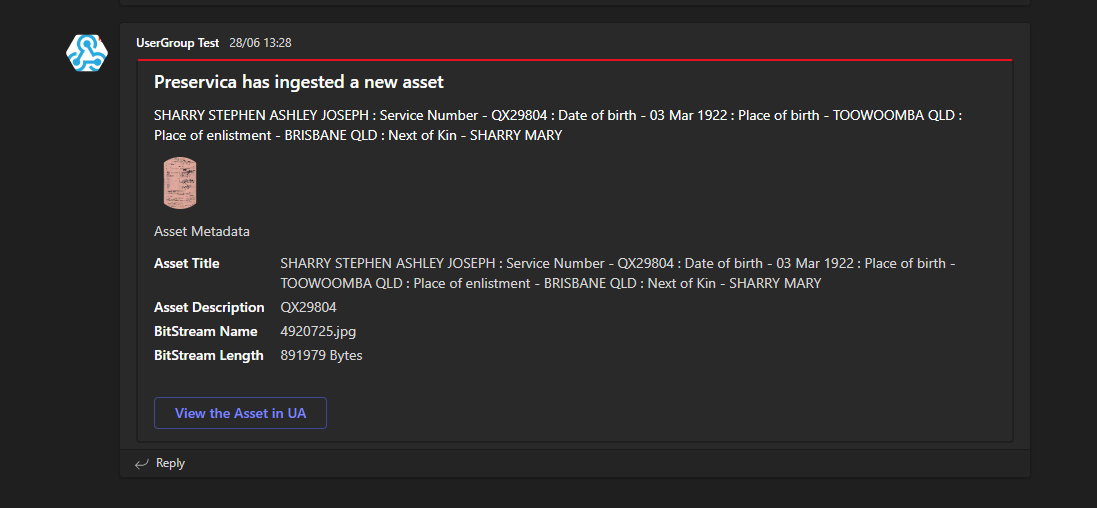
Every ingest now creates a new Teams message containing information about the Asset, for example
Event Driven Serverless Architecture
In the examples above, a web server is used to receive the web hook notifications. This can turn out to be
inefficient as the web server needs to be running on a server even when no notifications are being sent.
In turns out that webhooks are especially well suited to modern serverless architecture
such as Amazon Lambda and Azure Functions. Running a dedicated web server can be inefficient and unnecessary.
AWS Lambda and Azure Functions are code fragments which are triggered to run from external events
such as web hooks. This is a simple and cost-effective approach to processing events.
- No application server provisioning and maintenance required
- Web server infrastructure is provided for you through the API Gateway
- Only pay for the milliseconds used
- Highly Scalable
- Secure
AWS has a dedicated set of infrastructure based on the API Gateway service
which allows public API endpoints to be created. These API endpoints act as the “front door” for the
webhook applications managing traffic management, CORS support, authorization and access control,
throttling, and monitoring etc. For the Preservica webhook use case the API gateway only needs to accept HTTP
POST requests.
When the API gateway receives a webhook notification it will pass the message payload from Preservica to the
AWS Lambda function which will carry out the appropriate action.
AWS Lambda supports multiple languages such as Java, Go, PowerShell, Node.js, C#, Python, and Ruby code, so you
can build your applications in the language of your choice.
A basic AWS Lambda function for Preservica web hooks in Python would look something like
    import json
    import os
    import hmac
    import hashlib


    def lambda_handler(event, context):
        secret_key = os.environ.get('PRES_SECRET_KEY')
        if 'queryStringParameters' in event:
            if event['queryStringParameters'] is not None:
                if 'challengeCode' in event['queryStringParameters']:
                    message = event['queryStringParameters']['challengeCode']
                    signature = hmac.new(key=bytes(secret_key, 'latin-1'), msg=bytes(message, 'latin-1'),
                                         digestmod=hashlib.sha256).hexdigest()
                    return {
                        "statusCode": 200,
                        "headers": {
                            "Content-Type": "application/json"
                        },
                        "body": json.dumps({
                            "challengeCode": f"{message}", "challengeResponse": f"{signature}"})
                    }
        else:
            if 'Preservica-Signature' in event['headers']:
                verify_body = f"preservica-webhook-auth{event['body']}"
                signature = hmac.new(key=bytes(secret_key, 'latin-1'), msg=bytes(verify_body, 'latin-1'),
                                     digestmod=hashlib.sha256).hexdigest()
                doc = json.loads(event['body'])
                if signature == event['headers']['Preservica-Signature']:
                    for reference in list(doc['events']):
                        ref = reference['entityRef']
                        ## DO WORK HERE
                    return {
                        "statusCode": 200,
                        "headers": {
                            "Content-Type": "application/json"
                        },
                        "body": json.dumps(event['body'])
                    }
Where we are fetching the shared key from the environment variables.
The event information sent to the lambda function comprises a json document with a body field which looks like
    {
      "subscriptionId":"9495ddbf7d4a0b9f030a3411c87f967d",
        "timestamp":"2023-10-11T10:52:42.469",
        "tenant":"BRAMA",
        "version":"6.10",
        "events":[{
            "event":"FullTextIndexed",
            "entityType":"IO",
            "entityRef":"7fdea7e0-1e72-4fb1-aadb-d7f9ee6ed8c2",
            "identifiers":[]}],
        "trigger":"FULL_TEXT_INDEXED"
    }
From this json document the entity type and entity reference of the ingested Asset can be extracted.